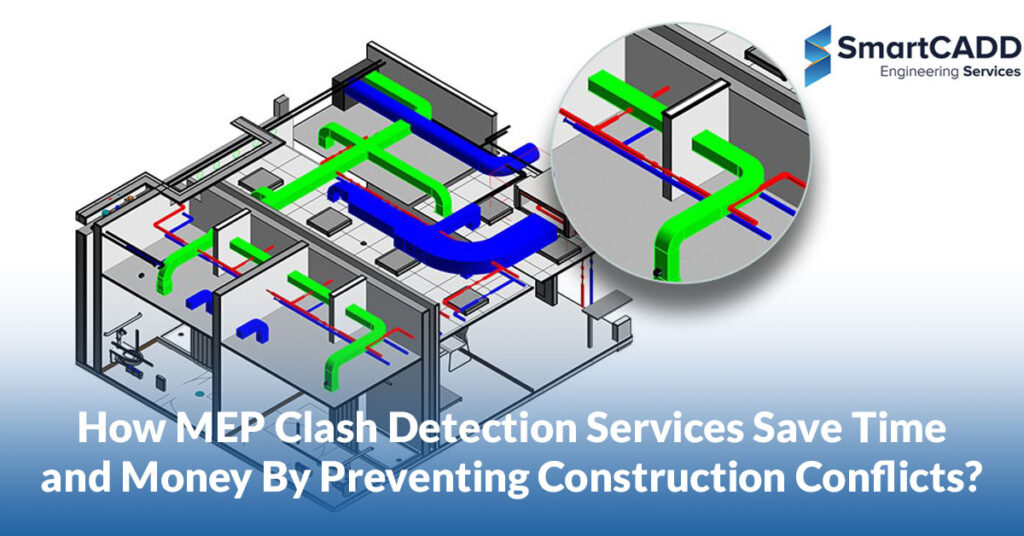


Building Information Modeling (BIM) has revolutionized the architectural, engineering, and construction industries by enabling enhanced coordination and clash detection before physical construction begins. Revit clash detection tools and strategies play a pivotal role in identifying and resolving design conflicts, ensuring smoother project execution.
Understanding the Basics of Clash Detection
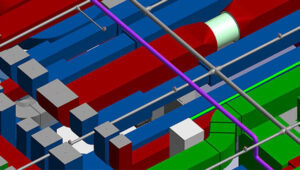
What is Clash Detection? At its essence, Revit clash detection serves as a fundamental component of the BIM coordination process. It is designed to preemptively identify points within a 3D model where building components might intersect or conflict—known as clashes. These are broadly categorized into three types:
- Hard Clashes: Occur when two solid components occupy the same space.
- Soft Clashes: Involve elements that intrude into each other’s geometric tolerances or required buffer zones.
- Workflow Clashes: Arise from scheduling conflicts, where two processes are planned to occur simultaneously.
Each type of clash has specific implications for project management and requires distinct strategies for resolution. Understanding these types will facilitate more effective clash detection and enhance overall project workflow.
1. Model Preparation and Setup
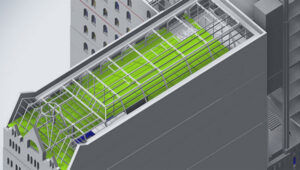
What does it take to set the stage for successful Revit clash detection? The answer begins with the meticulous preparation and setup of 3D models. It’s essential that all stakeholders—architects, engineers, and construction managers—collaborate using a unified platform to forge a comprehensive 3D model of the proposed structure.
Key Steps:
- Collaborative Modeling: Ensure that all parties are working from a unified model to prevent discrepancies.
- Detailed Documentation: Include all necessary architectural, structural, and MEP details to facilitate accurate clash detection.
- Regular Updates: As the project progresses, continuously update the model to reflect any changes or new insights.
This initial phase is critical because it sets the parameters within which clash detection operates, establishing a baseline for identifying and resolving potential conflicts efficiently.
2. Utilizing Navisworks for Enhanced Detection
Guidelines for Using Navisworks:
- Export and Import: Begin by exporting the Revit model in a format compatible with Navisworks, typically NWC or NWD, and then import it into the Navisworks environment.
- Environment Setup: Configure the project’s settings, including units, levels, and viewpoints, to align with the project’s specifications.
- Clash Detective Tool: Use this powerful feature to systematically identify and categorize potential clashes between different systems and components.
The strategic use of Navisworks not only enhances the detection capabilities but also provides a more granular control over the clash detection process, enabling teams to pinpoint and address issues with greater precision.
3. Setting and Adjusting Tolerance Parameters
Why is setting appropriate tolerance parameters in clash detection crucial? It ensures that the software identifies only genuine clashes, reducing the noise of false positives that can clutter the process. Proper tolerance settings are vital for focusing efforts on significant issues that could impact the project timeline or budget.
Considerations for Tolerance Settings:
- Understand Project Needs: Different projects might require different levels of precision. Understand the specifics of your project to set relevant tolerances.
- Set Clearance Tolerances: Define how close elements can be to each other before they are considered to clash. For instance, a tolerance of 5mm might be appropriate for detecting critical structural clashes.
- Adjust Overlap Tolerances: Determine the acceptable overlap between components, which is crucial for MEP systems where slight intersections might not pose a problem.
Setting these parameters carefully ensures that the clash detection process is tailored to the specific needs of the project, enhancing both the efficiency and effectiveness of the detection efforts.
4. Running and Managing Clash Tests
Steps to Execute Clash Tests:
- Initiate New Tests: Within Navisworks, navigate to the “Clash Detective” tab and begin by setting up a new test, specifying the clash rules and test parameters like tolerance and search distance.
- Selection of Models: Choose which models or elements to include in the test, ensuring that all relevant parts of the construction are checked for conflicts.
- Run the Tests: Execute the clash tests, allowing Navisworks to process the information and identify where clashes occur.
Following these steps allows teams to systematically address potential issues before they become actual problems, greatly improving project efficiency and reducing unexpected challenges.
5. Clash Resolution and Reporting
- Review and Categorize Clashes: Each identified clash should be reviewed to understand its impact on the project. Categorizing them based on severity can help prioritize which issues to address first.
- Collaborative Resolution: Engage relevant stakeholders in the resolution process. For example, structural engineers and MEP specialists might need to collaborate to modify designs that conflict.
- Documentation and Reporting: Update the clash reports with resolutions and circulate them among the project team. This documentation is crucial for tracking resolved issues and ensuring all team members are informed of changes.
By fostering a collaborative approach to resolving clashes and maintaining thorough documentation, projects can achieve a higher standard of precision and efficiency. This not only minimizes costly delays but also ensures that the final construction is free from preventable errors.
- Early Integration: Incorporating clash detection at the project’s inception is crucial. This early-stage focus helps anticipate potential issues and provides ample time for resolution before they escalate, minimizing costly delays and rework.
- Comprehensive Model Preparation: Ensure all models are meticulously prepared and reviewed before proceeding to the clash detection phase. This involves organizing and optimizing the models to enhance clarity and accuracy during the detection process.
- Use of Advanced Tools: Employing advanced BIM tools like Navisworks or Solibri enhances the clash detection process. These tools allow for detailed setting of clash tolerances, and sophisticated algorithms help in identifying and prioritizing clashes based on their severity and impact on the project.
- Regular and Systematic Testing: Conduct clash detection tests regularly as the project progresses. This iterative process helps in catching new clashes that might arise from modifications or further detailing of the project models.
- Collaborative Resolution Process: Once clashes are identified, fostering an environment of collaboration is key for effective resolution. Engage all relevant stakeholders—architects, engineers, and construction managers—in the resolution process. Utilize centralized communication systems to discuss and resolve clashes promptly.
- Documentation and Reporting: Keeping thorough records of all detected clashes, their resolutions, and the parties responsible is essential. This not only aids in immediate resolution but also serves as a reference to avoid similar issues in future projects.
- Leveraging Technological Advances: Stay updated with the latest developments in BIM technology. Emerging tools and functionalities can offer more precise detection capabilities and streamline the clash detection process.
Conclusion on SmartCADD
At SmartCADD, we leverage state-of-the-art tools like Revit and Navisworks to ensure that our BIM modeling services are not only efficient but also cost-effective. By integrating advanced clash detection techniques early in the design phase, we help minimize rework and delays, ensuring that our projects meet the highest standards of quality and safety.
FAQS
Revit clash detection is a process that identifies clashes or conflicts between different building elements in a BIM model. It’s crucial in BIM projects to prevent construction errors, optimize coordination, and improve overall project efficiency.
Using Revit for clash detection offers several benefits, including early clash detection, improved collaboration among project stakeholders, reduced rework and costs, enhanced project coordination, and better overall project outcomes.
Revit clash detection contributes to project success by minimizing errors, streamlining coordination, reducing project delays, and ensuring compliance with design specifications. This leads to improved project quality, on-time delivery, and enhanced client satisfaction.